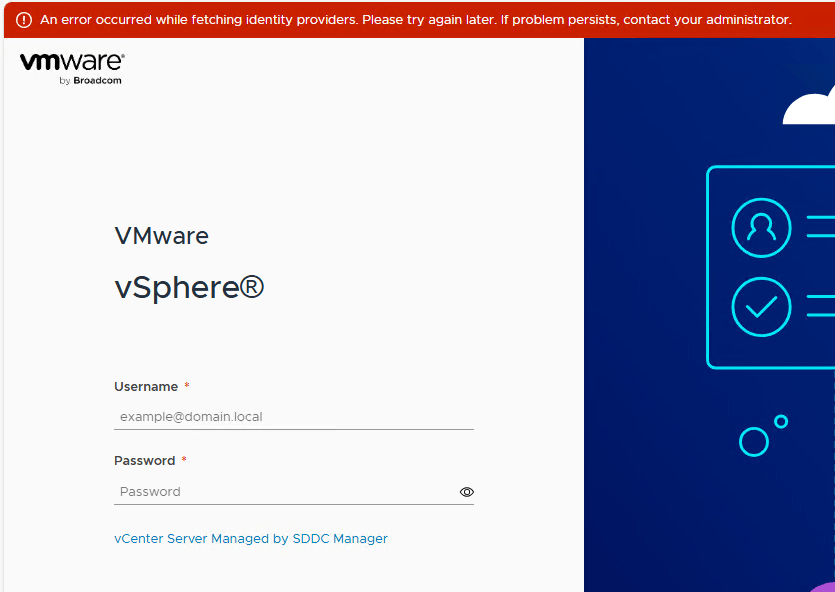
I recently came across an issue in our VCF 9.0.1 lab where in the management domain vcenter had an issue with its identity provider and the exact error was “An error occurred while fetching identity providers. Please try again later. If problem persists, contact your administrator.”
The error screenshot is as below
When this Issue occurred, we can’t login using our domain credentials into the vcenter and have to use the SSO creds to get into the vcenter
Solution:
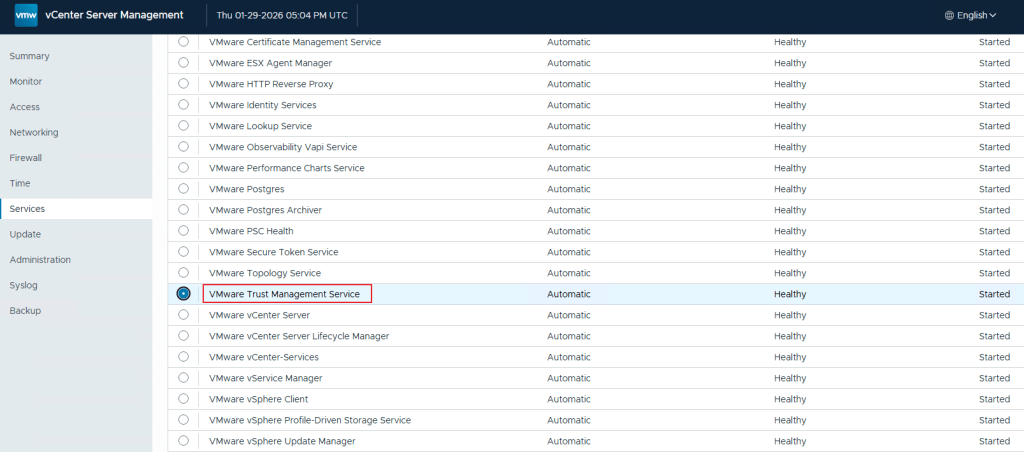
I have checked the VAMI of the vcenter server to check its services first and found that the service VMware Trust Management Service was not started even though it was supposed to start Automatically.
I started that service and refreshed my browser for my vcenter and the identity provider error was resolved.
unfortunately I didn’t take a screenshot of the service when its stopped, but I took a screenshot of after the service has been started as below
So, starting this service resolved the identity provider issue we had.
I recently encountered an issue in my lab. I was trying to patch my ESXI hosts from version 8.0U3b/3d to 8.0U3e/f. I used the SDDC Manager and an Imported LCM Image (Dell Custom ESXI Image). The task was failing at Post check like in the below Screenshot
On digging a little deeper into the issue, I found the SDDC Manager Inventory Sync to be the problem. The ESXI Hosts Upgrade is done. Yet, the SDDC Manager does not register that all the ESXI hosts in the cluster have finished upgrading. As a result, it fails.
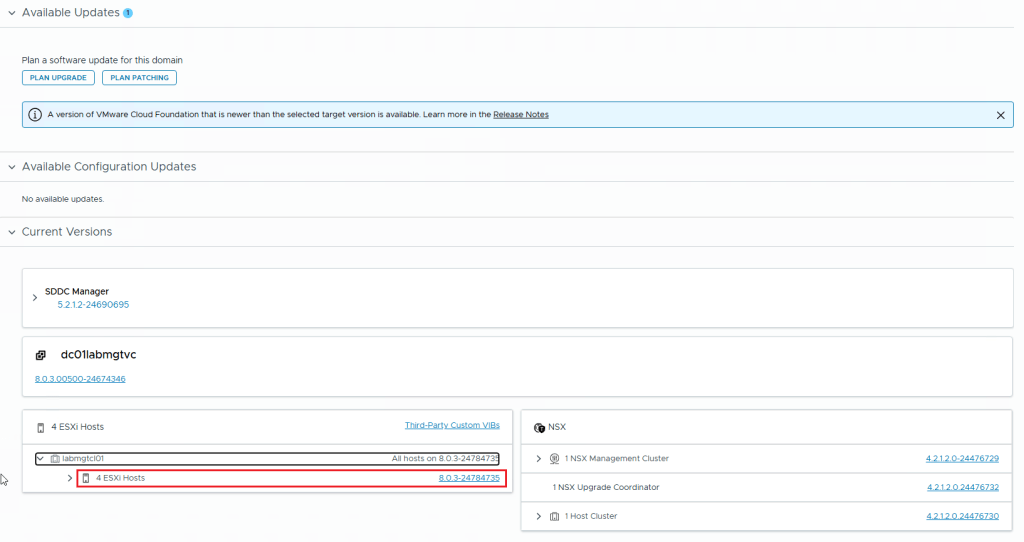
As you can see in the above image, SDDC Manager doesn’t see the proper host version. This issue affects all the ESXI hosts in the same cluster.
I did verify that all the 4 hosts are of the same version (In this instance the version is 8.0.3-24784735)
This issue can be resolved by performing an Inventory sync from within the SDDC Manager. Use the asyncPatchTool for this task. You can download it from the Broadcom website. Here are the Instructions on how to download the async patch tool from the broadcom website.
** You need to have an active entitlement to get this tool. **
Once you download the asyncPatchTool, transfer the tool (vcf-async-patch-tool-1.2.0.0.tar.gz) to /home/vcf directory in the SDDC Manager using WinSCP tool.
Make Sure you follow the instructions in this document in regards to the asyncPatchTool folder and then go to SDDC manager SSH and use the following commands to perform an inventory sync using the asyncPatchTool
./vcf-async-patch-tool --sync --sddcSSOUser administrator@vsphere.local --sddcSSHUser vcf

(Assuming your sddc manager sso account is administrator@vsphere.local)
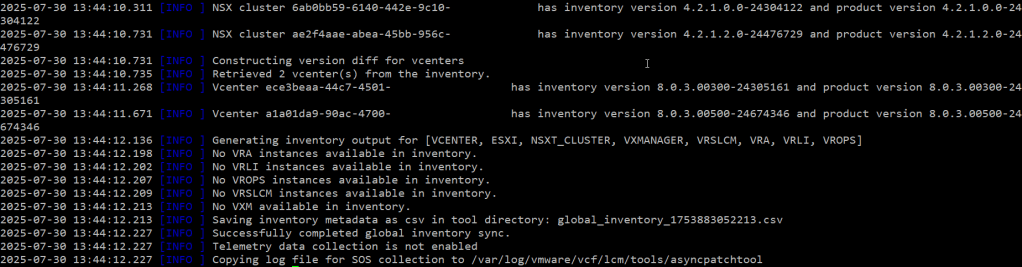
As you can see from the above screenshots, perform an inventory sync using the asyncPatchTool. The correct versions of ESXI hosts and other products appear in the output.
In the below screenshot, you can see that I ran the asyncPatchTool Inventory sync. Then I checked the SDDC Manager. My ESXI hosts are all showing the correct version.
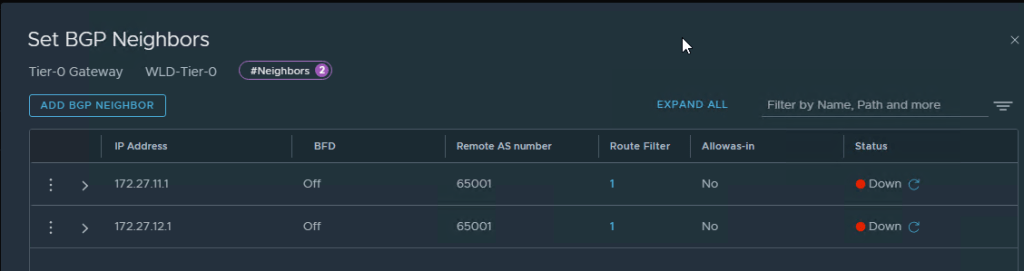
Recently, while I was deploying an NSX Edge Cluster in the Workload domain in the Holodeck 5.2x (I deployed VCF 5.2.1) when I encountered an error in SDDC Manager “Verify NSX BGP Peering” which failed the Adding Edge Cluster task.
Here are the screens on how it looked once I logged into NSX Manager Web UI
You can see that the BGP Neighbors are showing as down in the UIYou can also see that the BGP Neighbors configuration is correct but they still show as down
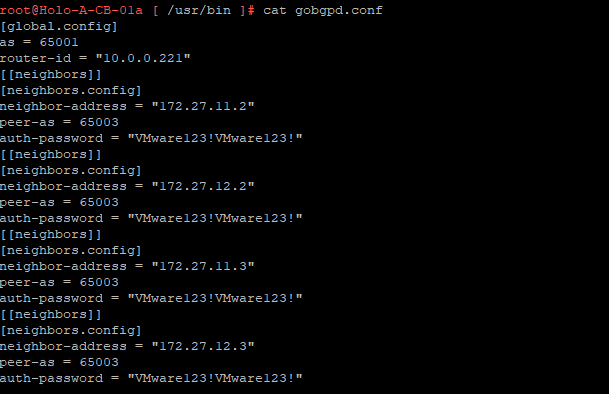
After a lot of troubleshooting, I got some help from my fellow vExpert Abbed Sedkaoui who directed me to check the BGP Configuration in CloudBuilder and the config file to check was the gobgpd.conf file in /usr/bin
This is how the old configuration was in the gobgpd.conf file which only had the BGP Neighbor IPs of the NSX Edges and it Tier-0 Config from the Management Domain
Edit this gobgpd.conf file and add the Tier-0 Uplink Interfaces as BGP Neighbors in this file as the below Screenshot
I have added the uplink IPs (172.27.11.10,11.11, 172.27.12.10,12.11) to the BGP neighbors list
Once the file is saved (You will have to hit ESC and then type :wq!, hit Enter), you can restart the gobgpd service with the following command
systemctl restart gobgpd
This will restart the gobgpd service and in a few minutes you should see the BGP Neighbors going green instead of down status in the NSX Manager UI
here is the command to check the gobgpd status in cloud builder
systemctl status gobgpd
NOTE: All the above commands are to be executed as root in the cloudbuilder appliance, first you SSH into the appliance using admin credentials and then use su to login as root in the appliance. (su creds are same as admin creds in the holodeck lab)
Now you can restart the NSX BGP Peering task again in SDDC Manager and it should go through and create the Workload Domain.
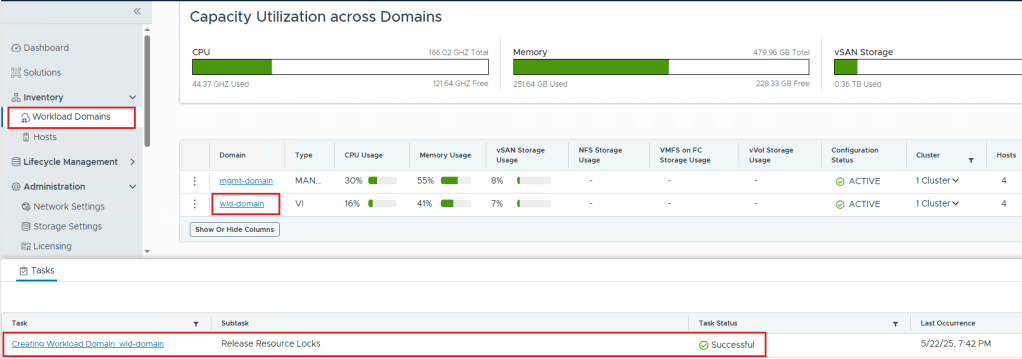
Login into the SDDC Manager, Go to the Workload Domain which you have created (In my case the workload domain name is wld-domain), go to the Edge Clusters tab
Click on Edge Clusters tab
Ignore the Errors in my lab, that’s just license errors in the lab env.
Click on Add Edge Cluster option as in the screenshot below
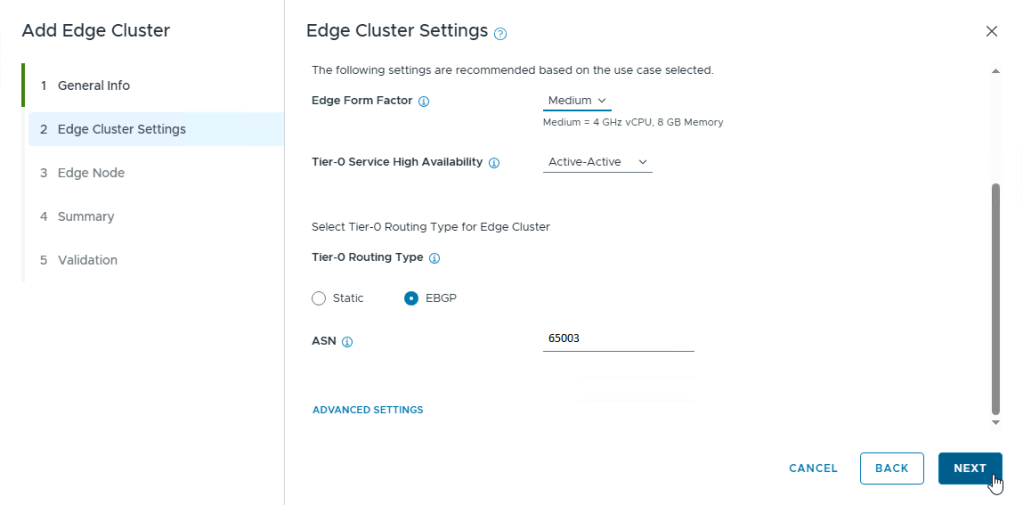
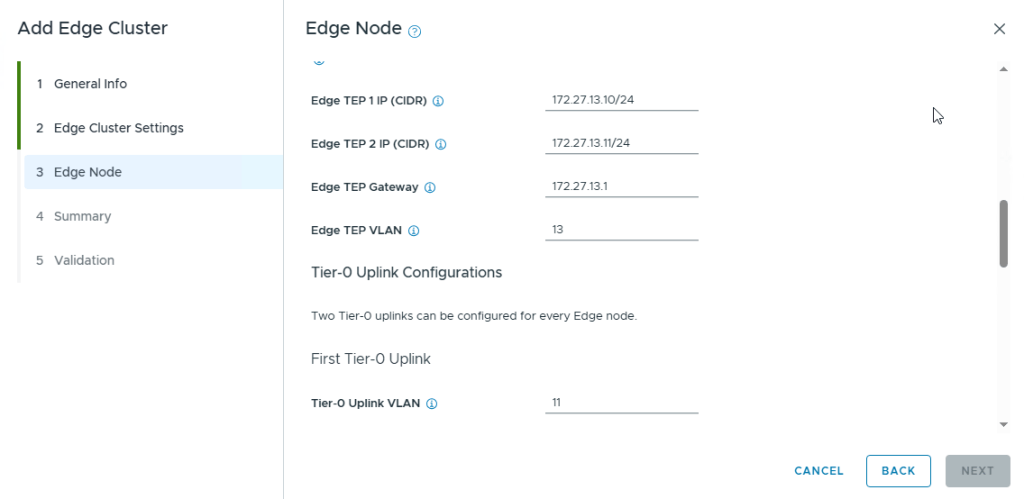
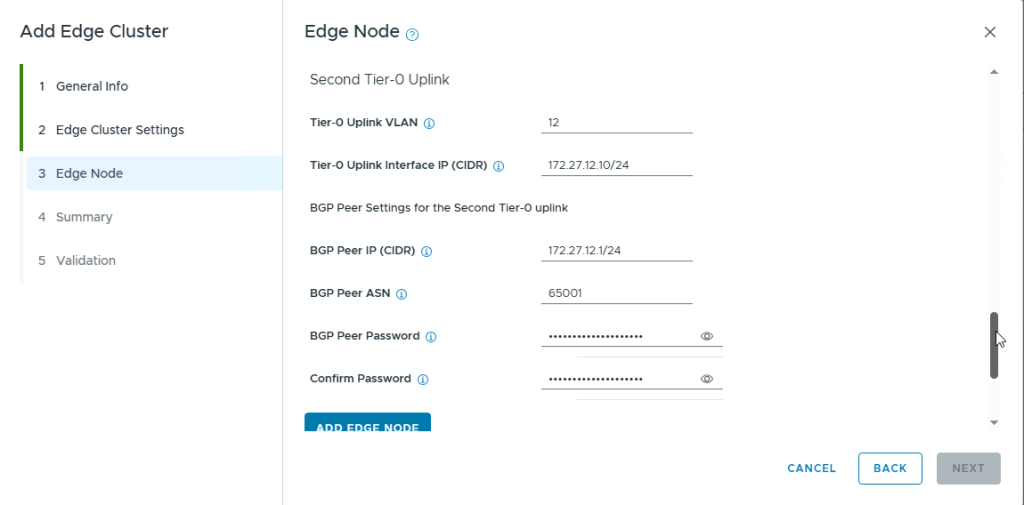
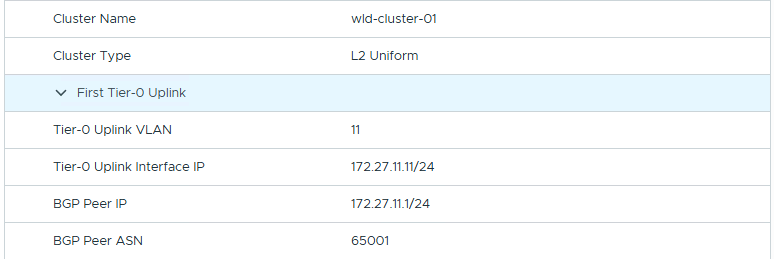
Clicking on Add Edge Cluster will pop another windowClick on Select All option and click Begin to start the processProvide the Cluster Name, MTU Size, Tier-0,1 Router Names, The Edge Cluster Profile Type is set to Default, provide the root passwords and credentials and click NextSelect the option ‘Custom’ under Edge Cluster Settings so that you can change the Edge Form Factor of the Edges (I used Medium in my lab), Select the HA option and scroll down to select the Routing typeSelect the option EBGP as we are going to use the BGP routing protocol in this Lab as that is how holodeck was designed. Use the ASN as 65003 as NSX Edges will always be in this ASN according to the architecture diagramNote the ASN of the NSX Edge Cluster and its BGP Neighbors (Cloud Builder acts as BGP Neighbor) here.Next, we provide the Edge Node detailsIn the VM Management Portgroup Name, you can give the portgroup name which you want the SDDC Manager to create as it will create the portgroup, or you can use existing VM management portgroup which was already created when we created the workload domain. If you want to use the existing portgroup, just click on the option “USE ESXI MANAGEMENT VMK’S VLAN” which is also VLAN 10 and then provide the EDGE TEP detailsEdge-1 TEP Details as per the holodeck architectureFirst Tier-0 Uplink detailsSecond Tier-0 Uplink detailsOnce you have provided all the details for Edge Node 1, click on Add Edge Node option
Perform the same steps to add the Edge Node 2 as well but with its own IP Addresses
Two Edge Nodes have been AddedSummary Screenshot 1Summary Screenshot 2Summary Screenshot 3Summary Screenshot 4Summary Screenshot 5Summary Screenshot 6Summary Screenshot 7 – Click Next for Validation of the Edges ConfigurationNSX Edge Cluster and its Validation
Once everything is Validated with no errors, it will start the Deployment of the Edge Cluster with Edges in the workload vcenter
Edge Cluster ProgressCompletion of the NSX Edge Cluster in SDDC ManagerVerification of the NSX Edge Cluster with its Edges under the workload domain in SDDC Manager
This Concludes this post on how to deploy NSX Edge Cluster with 2 Edges in the Workload Domain using SDDC Manager
I have encountered an issue while deploying the NSX Edge Cluster in the workload domain in Holodeck and that is while it was trying the NSX BGP Peering Verification from the SDDC Manager and the BGP Neighbors were down. This was not provided in any documentation and I have documented about this issue and its resolution in this post.
I have attended this session in Explore 2024 Las Vegas and here is what I have learnt from this session in regards to architecting Microsoft SQL Server in the vSphere Environment. Even though the session heading shows that it is about VCF ( VMware Cloud Foundation), the reality is that these suggestions and recommendations are for vSphere. VCF is a combination of vSphere, VSAN, NSX and Aria Suite.
NOTE: I know its already close to VMware Explore 2025 but I found these on my phone from last year’s Explore and wanted to Post before I totally forget about these options in regards to SQL Server and its Performance on vSphere.
Below are few of the improvements to be made to the SQL Server VMs and VMware Best Practices (As shown in Explore 2024)
NUMA: Recommended VCPU Configuration
Here are the optimal numbers for vCPU per SQL Server VM
Storage Best Practices
Here are the Storage Best Practices for a SQL Server VM on VSAN Storage and VMFS Storage
Best Practices for VM Disk Layout
VM Disk Layout example
Network Best Practices
These are the network best practices and I have seen much better network performance with VMXNET3 NIC on SQL Server 2016 and up Servers (VMs)
SQL Server High Availability Options
HA Options for SQL Server, I would strongly advice against using RDM disks on the SQL Server VMHA Options Example on a SQL Server VM
Power Management of the VMs
SQL Server Configuration
This is the SQL Server Configuration (few of the best practices)
SQL Server High Availability
Windows RSS Options
I personally haven’t seen the RSS options in the windows server configured but these are the options which could help.
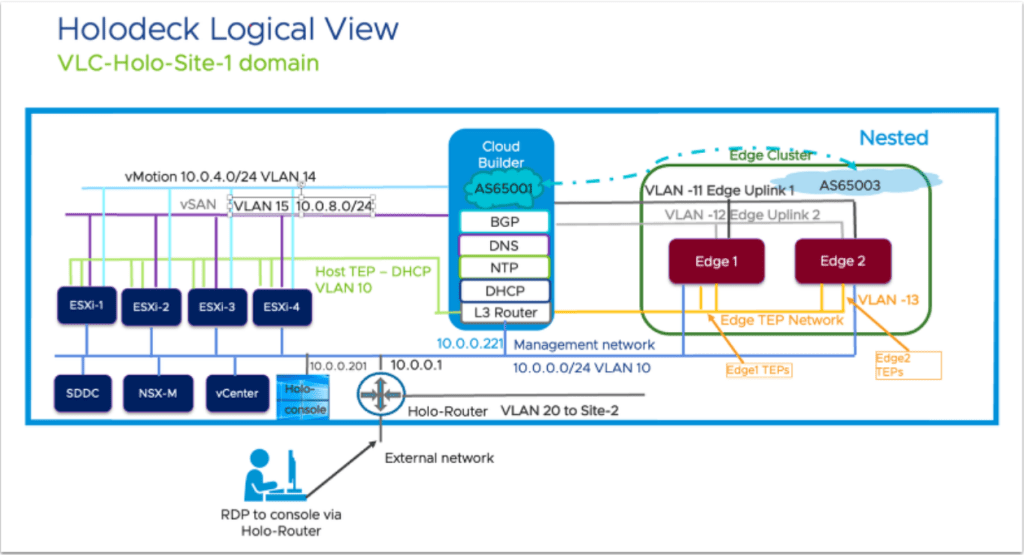
In this post, I will be going over how to deploy a workload domain in the holodeck lab if you have only deployed the management domain with NSX Edge Cluster configured in it by using VLC GUI
In my lab, I was unsuccessful the first try in getting VLC GUI to deploy the workload management with NSX Edge Cluster in it, so I only deployed the management domain and then configured the workload domain using the SDDC Manager.
First, you will have to use “add_4_big_hosts_ESXi5-8.json” or “add_4_hosts_ESXi5-8.json” using the VLC GUI to provision 4 nested esxi hosts esxi5-esxi8 in the lab env.
Once the hosts are created, you will have to use the commission hosts option under Hosts in SDDC Manager to get the 4 esxi hosts into the SDDC Manager. Once the 4 esxi hosts are unassigned in the SDDC Manager, we will start the creation of the workload domain using the SDDC Manager.
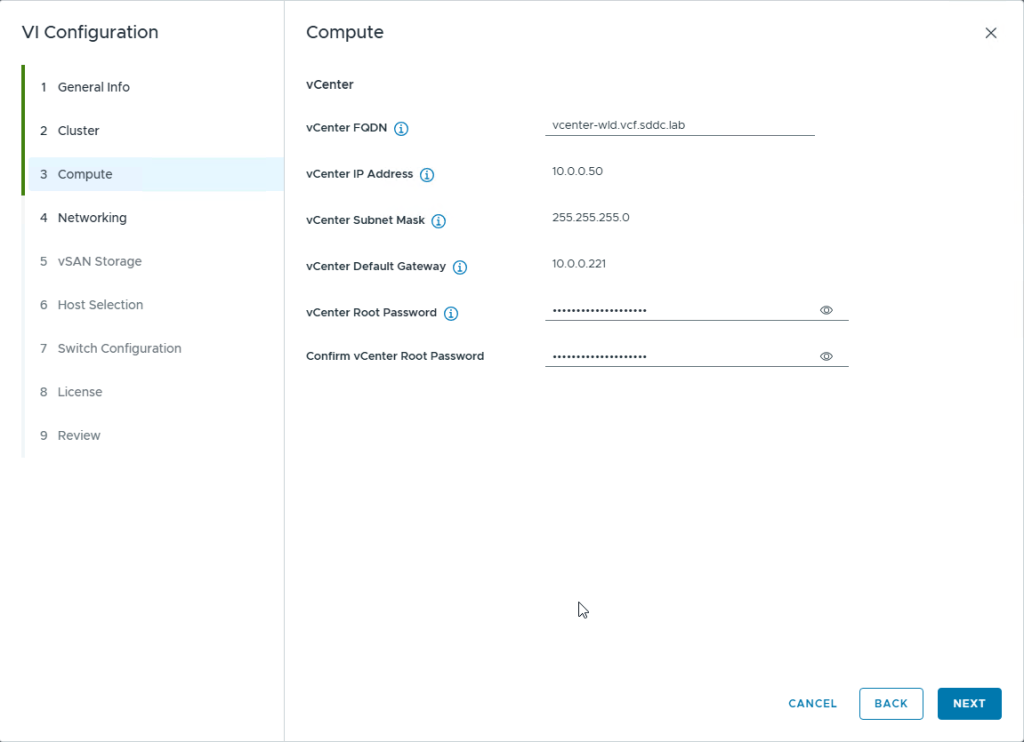
Click on Workload Domains option on the left side, then click on the Workload Domain dropdown option and select the option VI-Workload Domain to start the workload domain creationEnter the information like the domain name, organization name etc and select the SSO domain name, in my case, I selected the option “Join Management SSO Domain”provide the cluster name and click nextProvide the details of the vcenter server to be deployed. These details should already be present in the Holo-Console under C:\VLC\VLC-Holo-Site-1\conf in the “additional_DNS_Entries.txt” fileProvide the network details to deploy the NSX Manager appliance and its Cluster IP.
NOTE: The SDDC Manager will only deploy 1 NSX Manager Appliance nsx1-wld even though you provide the network details for all 3 managers
Provide the NSX Credentials as present in the Holodeck Console VM and click Next to continueSelect the amount of failures to tolerate for the VSAN Storage (I have deployed VSAN OSA in this lab), I have also selected VSAN Dedup and Compression for the vsan datastoreselect the esxi hosts (esxi-5 to esxi-8) and click NextUnder the Switch Configuration you can pick between these 3 options, but I picked the NSX Traffic Separation option as I wanted to have a separate dv switch for NSX trafficOnce you select the Switch Configuration Profile, You will need to select the VLAN for Management traffic, click on Edit as the screenshot aboveEnter the VLAN as VLAN 10 as this is the vlan used for Host TEP for DHCP and NSX Overlay according to the holodeck architecture diagram as shown belowClick on Acknowledge for the Next option to appear
Click Next to ContinueClick on License Later as you can add the licenses later and continueCheck the Summary and click on Finish to Initiate the Workload Domain Creation in SDDC ManagerThis Shows that the workload domain was created and you can confirm that by checking the task as well as going to Workload Domains and checking the workload domain (in my lab the name is wld-domain) is active.
This is the next part to my post How to Fix the Certs Error in vCenter 8.x in VCF 5.2 where we fixed the certs in the vcenters in both management and workload domains. Now, since the certificates of the vcenters are changed, the SDDC Manager has an issue and when we try to get to the sddc manager URL we get the following error:
The error message says that it has to do with “Identity Internal Server Error” which basically says that it has an issue communicating with the vcenters.
To fix this issue, we will need to download a python script called VcRootCaSync.py from the KB article 316007 and then execute the following command from the SDDC Manager
python VcRootCaSync.py
Once you execute this command from within the SDDC Manager, it will show you the active vcenters and you can pick which vcenter server you want to refresh the root cert in the sddc manager.
In our case, since we have 2 vcenters (management and workload domain), I had to execute this command twice to do the same process for both the vcenters and this fixed our issue with the SDDC Manager UI not showing the Login page.
Recently we had an issue in our production environment vcenters to renew the Machine SSL Cert and I was not able to do it using GUI in vcenter as it was showing an error message:
you can see in the above screenshot the error message it was showing when trying to renew the Machine Cert from the vCenter UI.
We checked the output from the vdt python script which we can get from the KB article (KB Article 90561) which shows the complete health of the vcenter server.
by looking at the FAIL checks in the machine certs on the vcenter, we decided to use the fixcerts.py script from the KB article 90561. This KB article lets you download a python script which can be used to fix the expired certs or to replace all the certs. We have decided to go and replace all the certs as our vcenters which are part of VCF 5.2 were upgraded from previous VCF Versions and the certs on the vcenter was created by External PSC’s in vSphere 6.7 a few years ago which don’t exist because the PSC’s are now embedded in the vcenter itself.
we had to use the fixcerts.py script to regenerate all the certs on the management and workload domain vcenter.
after regenerating and renewing the machine cert on the vcenters, we faced another issue with SDDC manager not able to recognize the vcenters because of their Cert changes. We will discuss this issue and its resolution in another post coming up.
Recently I received a 502 Bad Gateway error when trying to access the SDDC Manager UI. This happened after Upgrading our VCF Environment from 4.5.0 to 5.1.1
After going through multiple troubleshooting steps, here is what I have done to resolve this issue.
Troubleshooting:
First things first, please check the volumes on your SDDC Appliance.
SSH into the appliance using the user vcf and then root and use the following command
#df -h
The above screenshot shows the output to check all the volumes on the sddc manager appliance.
In this case, the /data volume is at 100% capacity and that was causing the UI not to load. So, I dug a little deeper into this volume to see what was occupying all the space in it and found this file which is occupying it.
Resolution:
After investigating the data volume, I did some research on the volume being full and found the following kb article from Broadcom, KB311989 which shows the way to increase the capacity of the /data partition and then to reboot the appliance to get it working.
I followed the steps in the KB article and once I increased the /data volume and rebooted the sddc manager, all the services came back up in the SDDC Manager and its UI was up.
Conclusion:
The issue was with the /data volume being full. Once we increased the capacity of this volume from the above KB, the UI Issue resolved itself.
In this post, let us see how to reset a password and make the account active in NSX-T.
Remember that this account was created using API as you can’t create local accounts using NSX-T UI. My NSX-T version is 3.2.2.x.x
Back Story: one of the local accounts which I created for skyline collector in our NSX-T environment password was expired. Hence, I had to use the API to Update the User account password and status to make the account ACTIVE again.
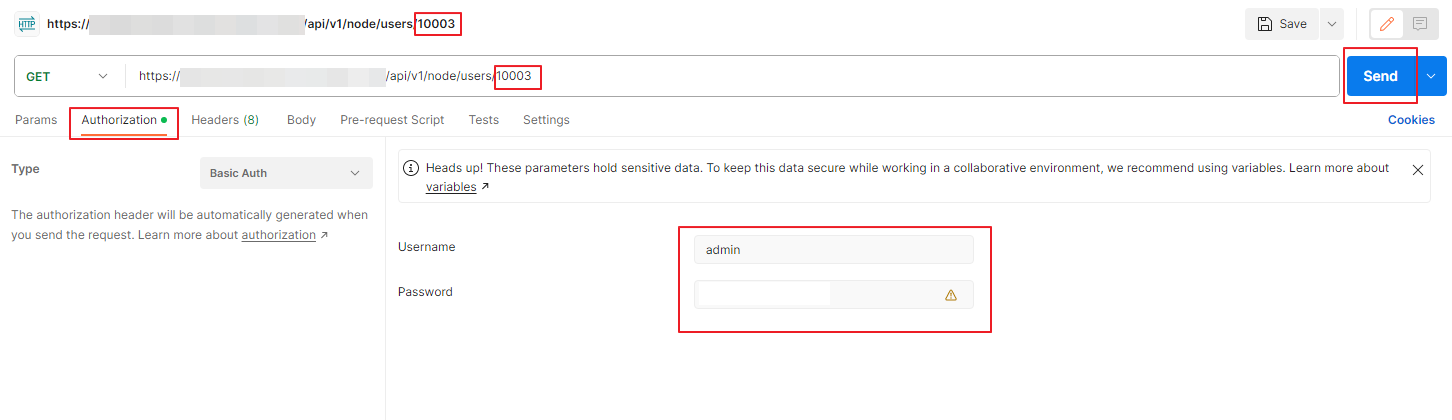
Use an API Editor like Postman to get the required data as shown in the screenshot below:
In the GET field, you will be providing the following code.
You can get the user-id pretty easily by going to System and User Management in NSX-T UI and get the user-id. In the above example my user-id is 10003. Then go to the Authorization tab and provide the username and password of the NSX-T Manager where you want to make these changes. Then click on Send option to get the required info.
you will get the data as the below screenshot.
You will observe that the last password has been changed 95 days ago, password change frequency is every 90 days, status is password expired and the actual username (in this case its labprdsky_nsxt)
you will have to change the body of this into the below values
You can change the password_change_frequency from 0 to 9999, you will have to provide the old password which is expired and the new password for this account and change the status to ACTIVE.
We will copy the above code into the body of the next PUT statement as shown below
Change the GET to PUT and insert the above code with the changed values in the body as the screenshot shown above and click on Send
The above output is in code form in case you want to copy it.
Now you can do the above GET command to get the status of the user and you will see that this account shows as active and the password change frequency is now 999 days.
Final output for GET for that user 10003
Hope this writeup helped you to unlock and reset the password of an local user created using API in NSX-T.