How To Reset an NSX-T API Local Account Password and Make the Account Active

In this post, let us see how to reset a password and make the account active in NSX-T.

Remember that this account was created using API as you can’t create local accounts using NSX-T UI. My NSX-T version is 3.2.2.x.x

Back Story: one of the local accounts which I created for skyline collector in our NSX-T environment password was expired. Hence, I had to use the API to Update the User account password and status to make the account ACTIVE again.

Use an API Editor like Postman to get the required data as shown in the screenshot below:

Your Image

In the GET field, you will be providing the following code.

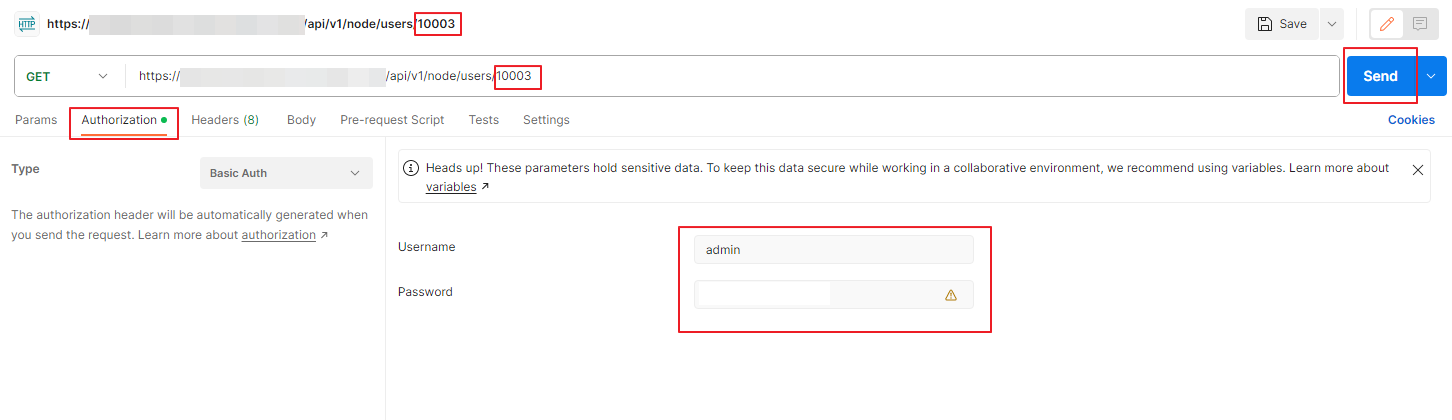
https://<nsx-t hostname/IP-address>/api/v1/node/users/<user-id>

You can get the user-id pretty easily by going to System and User Management in NSX-T UI and get the user-id. In the above example my user-id is 10003. Then go to the Authorization tab and provide the username and password of the NSX-T Manager where you want to make these changes. Then click on Send option to get the required info.

you will get the data as the below screenshot.

You will observe that the last password has been changed 95 days ago, password change frequency is every 90 days, status is password expired and the actual username (in this case its labprdsky_nsxt)

you will have to change the body of this into the below values

{
"full_name": "Guest User1",
"last_password_change": 1,
"password_change_frequency": 999,
"old_password": "<old_password>",
"password": "<new_password>",
"password_reset_required": false,
"status": "ACTIVE",
"userid": 10003,
"username": "labprdsky_nsxt"
}

You can change the password_change_frequency from 0 to 9999, you will have to provide the old password which is expired and the new password for this account and change the status to ACTIVE.

We will copy the above code into the body of the next PUT statement as shown below

Change the GET to PUT and insert the above code with the changed values in the body as the screenshot shown above and click on Send

The output will be displayed as below

{
"full_name": "Guest User1",
"last_password_change": 0,
"password_change_frequency": 999,
"password_reset_required": false,
"status": "ACTIVE",
"userid": 10003,
"username": "labprdsky_nsxt"
}

The above output is in code form in case you want to copy it.

Now you can do the above GET command to get the status of the user and you will see that this account shows as active and the password change frequency is now 999 days.

Final output for GET for that user 10003

Hope this writeup helped you to unlock and reset the password of an local user created using API in NSX-T.

Modify the Sequence number of an NSX Security Policy using REST API (NSX-T 3.2.2.x)

WARNING: This is for advanced users only and use it only for specific use cases if required or contact the VMware Support if needed.

Recently, we had to change the sequence number of one of our Security Policies in the Distributed Firewall in NSX-T version 3.2.2 and here is the procedure.

First, we use Postman/ any api editing tool to get the security policies/security policy from the nsxt manager/VIP

In the screenshot above, the number (1006) after the security policies is the security policy itself (in our case, since we had nsx-v to nsx-t migration recently, it assigned a number to the policy, However, if you have nsx-t directly, the name is the same as the actual policy name instead of a number)

you can see the sequence number shown in the above screenshot. this is what you will need next

use the POST command below to increase the sequence number

https://<nsx-t_manger_hostname>/policy/api/v1/infra/domains/default/security-policies/1006?action=revise&anchor_path=/infra/domains/default/security-policies/default-layer3-section&operation=insert_before

After revise the anchor path is the path where you want the security policy to be. (In my example it is before the last security policy (default_layer3) in the distributed firewall)

go to body and change it to raw in POST

Then copy the full code from starting braces { to the end braces } for the security policy you are wanting to change the sequence number

Example:

{
            "logging_enabled": false,
            "target_type": "DFW",
            "resource_type": "SecurityPolicy",
            "id": "1006",
            "display_name": "Allow-All-ENV",
            "description": "The name of this section in V setup is: 'Allow-All-ENV :: NSX Service Composer - Firewall' and its description is: 'None'. This section is imported from the V setup by V2T migrator.",
            "tags": [
                {
                    "scope": "v_origin",
                    "tag": "DFW Section-1006"
                }
            ],
            "path": "/infra/domains/default/security-policies/1006",
            "relative_path": "1006",
            "parent_path": "/infra/domains/default",
            "unique_id": "637b1cc3-f20e-4d97-9e88-3da9c4b1e2ae",
            "realization_id": "637b1cc3-f20e-4d97-9e88-3da9c4b1e2ae",
            "marked_for_delete": false,
            "overridden": false,
            "sequence_number": 999999,
            "category": "Application",
            "stateful": true,
            "tcp_strict": false,
            "locked": false,
            "lock_modified_time": 0,
            "scope": [
                "ANY"
            ],
            "is_default": false,
            "_create_time": 1688872097541,
            "_create_user": "admin",
            "_last_modified_time": 1693451058351,
            "_last_modified_user": "admin",
            "_system_owned": false,
            "_protection": "NOT_PROTECTED",
            "_revision": 1
        }

Note that I have removed the line “internal_sequence_number” from the body above and replaced the sequence number with the highest number you can provide which is 999999

The screenshot is as below

You will have to execute this atleast a few times and the sequence number increases everytime. Make sure to change the revision value at the bottom in the body (upper part of the body) everytime you execute this POST method.

Once you are satisfied with the sequence number, you are done with this change.

NOTE: Make sure you take a full backup from the NSX-T Manager before making this change