How to troubleshoot vSAN issues?

Great Comprehensive Post on How to Check for VSAN Issues in your Environment !!

VirtuallyVTrue

Hope you are doing all great, for today’s post I wanted to put together some of the commands/troubleshooting I’ve had used with VMware vSAN,

Identify a partitioned node from a VSAN Cluster(Hosts)

What a single partitioned node looks like:

~ # esxcli vsan cluster get
Cluster Information
 Enabled: true
 Current Local Time: 2020-10-25T10:35:19Z
 Local Node UUID: 507e7bd5-ad2f-6424-66cb-1cc1de253de4
 Local Node State: MASTER
 Local Node Health State: HEALTHY
 Sub-Cluster Master UUID: 507e7bd5-ad2f-6424-66cb-1cc1de253de4
 Sub-Cluster Backup UUID:
 Sub-Cluster UUID: 52e4fbe6-7fe4-9e44-f9eb-c2fc1da77631
 Sub-Cluster Membership Entry Revision: 7
 Sub-Cluster Member UUIDs: 507e7bd5-ad2f-6424-66cb-1cc1de253de4
 Sub-Cluster Membership UUID: ba45d050-2e84-c490-845f-1cc1de253de4
~ #

What a full 4-node cluster looks like (no partition)

~ # esxcli vsan cluster get Cluster Information Enabled: true Current Local Time: 2020-10-25T10:35:19Z Local Node UUID: 54188e3a-84fd-9a38-23ba-001b21168828 Local Node State: MASTER Local Node Health State: HEALTHY Sub-Cluster Master UUID: 54188e3a-84fd-9a38-23ba-001b21168828 Sub-Cluster Backup UUID: 545ca9af-ff4b-fc84-dcee-001f29595f9f Sub-Cluster UUID: 529ccbe4-81d2-89bc-7a70-a9c69bd23a19 Sub-Cluster Membership Entry Revision: 3 Sub-Cluster Member UUIDs: 54188e3a-84fd-9a38-23ba-001b21168828, 545ca9af-ff4bfc84-dcee-001f29595f9f…

View original post 1,361 more words

Obtain the placement of the physical disk by NAA id on the ESXi Hosts

This is a great Post on How to find the Physical Location of the disks on an esxi host.

VirtuallyVTrue

Here is a simple script to obtain the placement of the physical disk by naa on ESXi hosts

Copy below script and save it on the ESXi host

# Script to obtain the placement of the physical disk by naa on ESXi hosts
# Do not change anything below this line
# --------------------------------------

echo "=============Physical disks placement=============="
echo ""
	
esxcli storage core device list | grep "naa" | awk '{print $1}' | grep "naa" | while read in; do

echo "$in"
esxcli storage core device physical get -d "$in"
sleep 1

echo "===================================================="

done

Run the script:

[root@esxi1:~] sh disk.sh

You will get similar output as per your environment.
Output:

[root@esxi:~] sh disk.sh =============Physical disks placement============== naa.5002538a9823d020 Physical Location: enclosure 1, slot 6 ==================================================== naa.5002538a9823d1c0 Physical Location: enclosure 1, slot 3 ==================================================== naa.58ce38ee204ccd59 Physical Location: enclosure 1, slot 7 ==================================================== naa.5002538a9823d070 Physical Location: enclosure 1, slot 1 ==================================================== naa.5002538a9823d040 Physical…

View original post 33 more words

How to Find the NIC Driver Version on ESXI Host and get the Correct Driver from VMware

Recently, I had to Search for an QLogic 2x25GE QL41262HMCU CNA NIC driver to update it on multiple Dell R740XD hosts. It’s been a while since I used the Update Manager (vSphere 6.7 environment) and hence writing this post.

First thing is to SSH into an esxi host and then execute the following commands to check the firmware/driver version of the vmnic you want to update (In my case all my vmnics are Qlogic CNA NIC’s)

esxcli network nic get -n vmnic2

Output to the above esxcli command

Things to note is the Driver Name/Type, Firmware Version (First Part of it is sufficient), Version (This is the actual driver version on the esxi host).

In the Above screenshot the driver is ‘qedentv’, the firmware version is 8.53.3.0 and the version is 3.11.16.0

Now, we need to find the entries/numbers to search for the exact driver on the VMware compatibility website.

Execute the following command on the ESXI SSH session

vmkchdev -l | grep vmnic2

The highlighted portion is the one we require to search for the driver on VMware Compatibility website

Let us go to the VMware Compatibility website and IO section

We need to fill in the following values —

VID, DID, SVID and Max SSID to get the exact driver for your nic.

Let us fill in the values from our vmkchdev output

  • VID 1077
  • DID 8070
  • SVID 1077
  • Max SSID 000b
Input the values in VMware IO Compatibility list website
Qlogic Adapter and its versions by vSphere version

Select the vSphere version and click on the version to display the different driver versions we can download

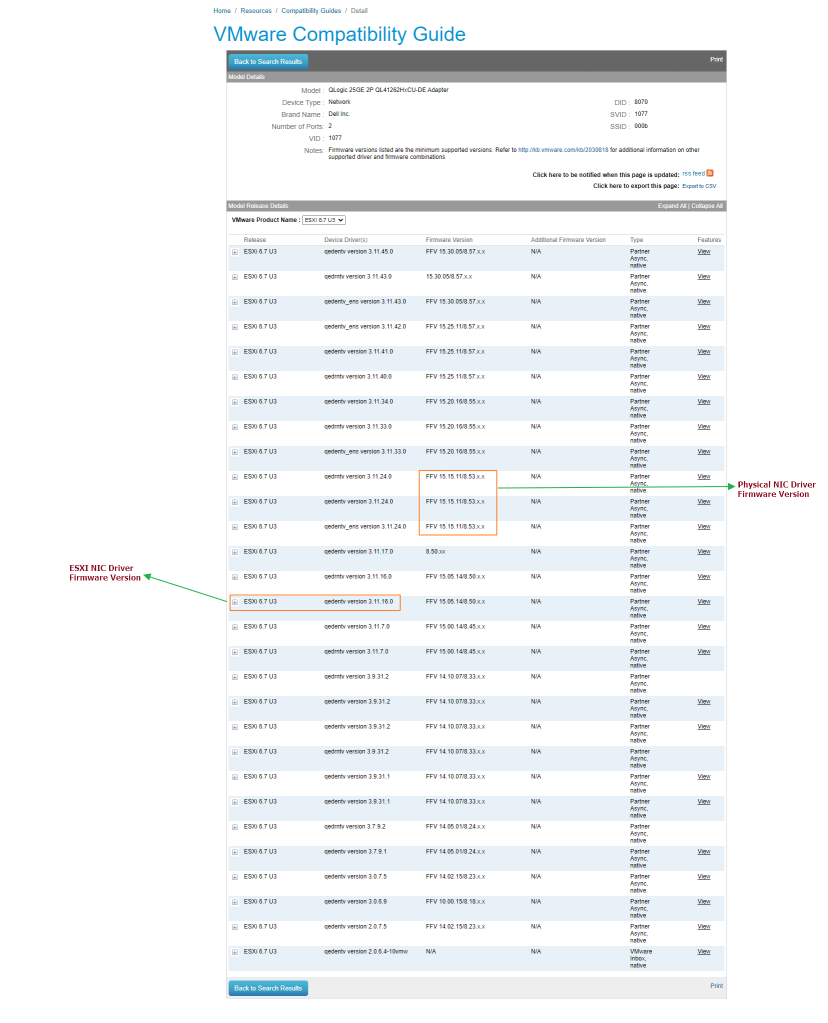
I have selected vSphere version 6.7 U3 in this case and the screenshot is below

The esxi nic driver version and the physical adapter firmware version is different on my Dell server

As you can see, the esxi nic driver version and the physical nic adapter firmware versions are different on this Host. (Typically you should update the esxi nic driver once you upgrade the physical nic firmware as a best practice)

In this case my esxi nic driver version is 3.11.16.0 and the Qlogic NIC Physical firmware version is 8.53.x.x

To download the correct driver, you need to make sure that the esxi nic driver coincides with the Physical nic driver firmware for best compatibility. We will need to download the ‘qedentv’ driver.

We download the driver equal to the physical nic firmware version and the esxi nic driver name which is qedentv in this case

Download the driver.zip file using your my vmware credentials and you can use this zip file in the offline patches in Update Manager to create a baseline for your esxi hosts so this driver can be updated.

NOTE: Put the Host in Maintenance mode before you update the nic driver as this will reboot the esxi host.

VMKPING and its uses in ESXI

I have recently been working with esxi hosts and to decommission them and recommission them into new projects and had to use the command vmkping to test the MTU of certain types of vmkernel ports like VMOTION, VSAN, VTEPs etc.

Here is a refresher for the vmkping commands which are very useful for a day to day Virtual Administrator

Command to check the MTU of 9000 with a certain amount of packets and with a certain interval and using a certain vmkernel port

vmkping -I vmk3 -d -s 8972 -c 1000 -i 0.005

vmkping -d -s 1472 <IP_Address>

In one of the above command vmkernel port is vmk3, for MTU 9000, we will be using 8972 as the packet size , -c is the count of packets and -i is the interval for which the ping will work (In the above example it is 0.005 seconds)

The second command is to test the MTU 1500 and the IP to test. You can also add -I (Interface) and vmkernel port through which you want to ping the IP

Command to check the communication of an IP address through an vmkernel port

vmkping -I vmk# IP address of the host

Command to get all the network adapters and the type of tcp/ip stack assigned to the nics

esxcfg-vmknic -l

Using the above command you can check the netstack which will be used in the below command to ping a vmotion vmkernel port

vmkping -S vmotion -I vmk1 <IP_Address_to_ping>

The -S is for netstack name like vmotion and this is the only command to be used if we use a NetStack

List of arguments:

vmkping [args] [host/IP_Address]

args:

  -4                            use IPv4 (default)

  -6                            use IPv6

  -c <count>            set packet count

  -d                           set DF bit (IPv4) or disable fragmentation (IPv6)

  -D                           vmkernel TCP stack debug mode

  -i <interval>           set interval (secs)

  -I <interface>         outgoing interface – for IPv6 scope or IPv4 bypasses routing lookup

  -N <next_hop>       set IP*_NEXTHOP – bypasses routing lookup

                                  for IPv4, -I option is required

  -s <size>                 set the number of ICMP data bytes to be sent.

                                  The default is 56, which translates to a 64 byte

                                  ICMP frame when added to the 8 byte ICMP header.

                                 (Note: these sizes does not include the IP header).

  -t <ttl>                   set IPv4 Time To Live or IPv6 Hop Limit

  -v                            verbose

  -W <timeout>        set timeout to wait if no responses are received (secs)

  -X                            XML output format for esxcli framework.

  -S                           The network stack instance name. If unspecified the default netstack instance is used.