Hello All,
Its been a while since I posted and today I have attended the VMUG Virtual Event of June 2018 and here are two links to check out their On-Demand Webcasts
Hello All,
Its been a while since I posted and today I have attended the VMUG Virtual Event of June 2018 and here are two links to check out their On-Demand Webcasts
Recently, I have come across an issue with the PSC’s not joining to the domain (They disconnected from the domain automatically) after upgrading the vCenter components (PSC01, PSC02 and vCenter windows server) from 6.0 Update 2 build 3634791 to 6.0 Update 2a build 4632154 or to 6.0 Update 3b build 5326079. This issue occurred as the windows domain controller was 2012 R2 and SMB 2 was the communication protocol to the domain controller. we have to enable SMB 2 on the PSC’s for them to communicate to the domain after the Upgrade.
here is the process to enable SMB2 on the PSC’s —
login to PSC01 and run the following command to check the values
/opt/likewise/bin/lwregshell list_values '[HKEY_THIS_MACHINE\Services\lwio\Parameters\Drivers\rdr]'
check the value of “Smb2Enabled”, this value will be 0, we will need to change it to 1 to enable it.
change SMB2 to be Enabled
/opt/likewise/bin/lwregshell set_value '[HKEY_THIS_MACHINE\Services\lwio\Parameters\Drivers\rdr]' Smb2Enabled 1
Once enabled, we need to restart the service lwio
/opt/likewise/bin/lwsm restart lwio
Check the values again —
/opt/likewise/bin/lwregshell list_values '[HKEY_THIS_MACHINE\Services\lwio\Parameters\Drivers\rdr]'
This time the value of “Smb2Enabled” will be 1.
This process is repeated for PSC02 as well and once this is done on both the PSC’s, you can go ahead and add the PSC’s to the domain and the function works !!
The process to change the SMB value on ESXi 6.0 is a little different and here are the commands —
Check values —
/usr/lib/vmware/likewise/bin/lwregshell list_values ‘[HKEY_THIS_MACHINE\Services\lwio\Parameters\Drivers\rdr]’
Change SMB2 to be enabled
/usr/lib/vmware/likewise/bin/lwregshell set_value ‘[HKEY_THIS_MACHINE\Services\lwio\Parameters\Drivers\rdr]’ SMB2Enabled 1
Restart lwio service
/usr/lib/vmware/likewise/bin/lwsm restart lwio
Resetting the root password on a Platform Services Controller (PSC) 6.0 U2 is taken from the following link —
Link to Reset PSC root Password
The above website clearly mentions on how to use the SUSE Linux Rescue CD to create a new root password and update it in the /etc/shadow file on the PSC itself and after reboot you will be able to get into the PSC with the new password.
Hope this helps !!
Recently I came across an issue where SRM 6.1 skipped few steps during a Recovery Plan failover from Recovery site to Protected Site. I had to dig into the SRM settings to find out why and I found that I didn’t configure the Custom IP network rules on the Recovery site so the recovery plan skipped customizing IP address on the recovered VMs back in Protected Site.
here is the message as shown:
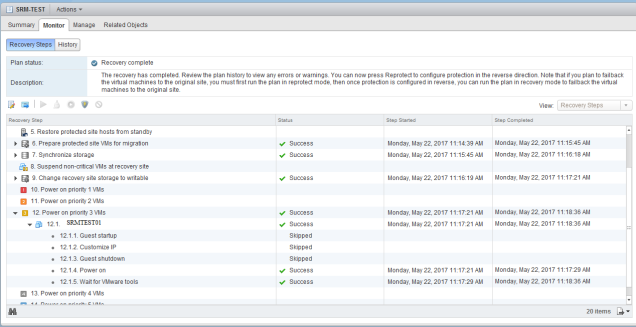
Explanation —
I have Two sites
Protected Site — NC
Recovery Site — Dallas
I have failed over from NC to Dallas fine because I put in the Network IP rules in the site NC under SRM –> Sites –> NC –> Manage –> Network Mappings, settings as shown:
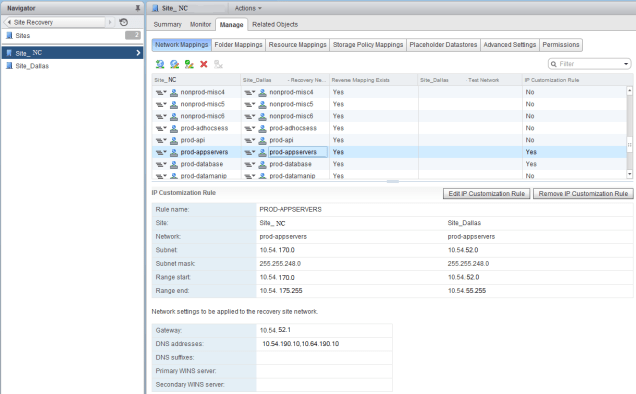
As shown above, I have created the network IP Customization rule in Site_NC but forgot to do it in Site_Dallas. That is the reason why when the failback from Dallas to NC was initiated it skipped the IP customization of the VMs during the Recovery process.
NOTE: Make sure that you configure the Network IP rules on both the Protected and Recovery sites so that the IP customization is applied on the VMs at both the sites.
My colleagues have been facing this particular error recently when working on the Converged Infrastructure (Vblock, VxBlock etc) that when trying to check the FI Cluster state, it gives an error ” Peer Client db version is lower than local, self version: 3, peer version: 1″ when SSH into the FI Cluster IP address. The screen shot is as shown below:
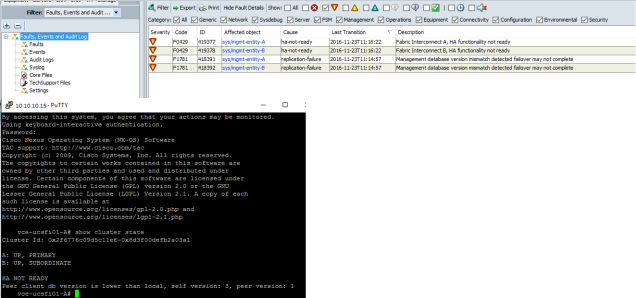
There are at least two resolutions which have worked so far with this kind of error on the FI Cluster
Resolutions
Let me know if you come across any solutions to this issue.
Looks like VMware finally got around to have a public statement on the release of vSphere 6.5 and here are some of its main NEW features
These are some of the main improvements in vSphere 6.5.
All this data has been taken from
http://blogs.vmware.com/vsphere/2016/10/introducing-vsphere-6-5.html
I have struggled to understand the concepts of VMware NSX major functionality like NSX Edge Services Gateway, Edge Distributed Logical Router and their options, hence I am writing this series to explain in detail what I have learnt in the past few days regarding these functions in layman terms and not the marketing jargon I see on the internet regarding VMware NSX.
Edge services Gateway has many functions such as L2 Gateway service, L2 Bridging between virtual to physical networks, DHCP, NAT etc.
It is very easy to create Logical switches in the NSX option using vCenter server web client
The hard part comes when you have multiple networks (with subnets) you want to activate on the edge services gateway so that they communicate to each other and to the external uplink on the edge services gateway.
Here is how I did it,
First, I created two Logical switches

I have an L2 physical network switch for my home lab, so I am sure I can’t do L3 routing, in this instance I am going to show you how to create an Edge Services gateway with the proper interfaces to have multiple subnets communicating between them on a VM connected to one of these logical switches.
First, we deploy an Edge services gateway using the default options and the interfaces as shown below:

Here are the interfaces which I have configured on the gateway
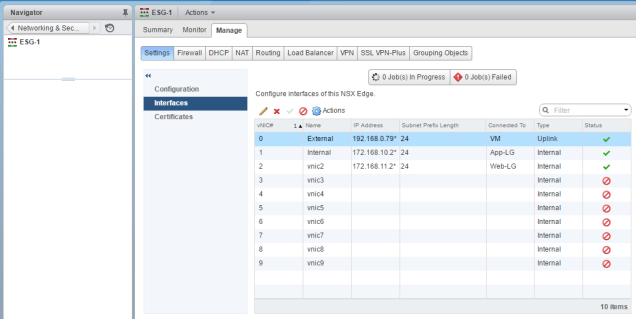
In the above picture, I created one vNIC as an Uplink (I named it as External) and the IP address I gave that interface as 192.168.0.79/24 (192.168.0.0/24) is my LAN subnet in my home
Then I created two Internal interfaces (I named one as Internal) with interface IP addresses as 172.168.10.2/24 and 172.168.11.2/24 where the IP addresses 172.168.10.2 and 172.168.11.2 act as IP default gateways to the VMs attached to logical gateways App-LG and Web-LG which are connected to the two internal interfaces
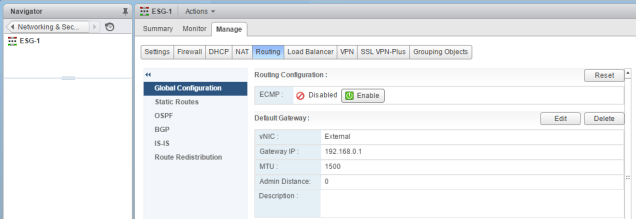
Also, I configured the Default gateway in the Edge Services Gateway configuration while deploying as shown:
Now, that we have configured the L2 logical networks on the Edge Services Gateway with the interfaces, let us go to the VMs and see how the communication goes on through the logical networks
We have a test VM called Win7 connected to App-LG (which has an interface IP address as 172.168.10.2) hence the default gateway of this VM will be 172.168.10.2
Here we see the communication using ping to all the interfaces ip addresses both internal and external

In the above picture, you can see that we are able to ping the three interfaces (192.168.0.79, 172.168.10.2 and 172.168.11.2) even though the VM gateway is 172.168.10.2 since its logical gateway is App-LG.
Also, note that we weren’t able to ping my default gateway 192.168.0.1 since there is no interface or routing to 192.168.0.1 in the edge services gateway. We will cover this under routing and NSX Distributed Logical Router part next.
By this, I am concluding this part as I wanted to show you how logical networks can be used with VMS and how their networks can route between the different subnets using Edge services gateway. This is for the East-West traffic between VMS.
As of 8/18/2016 Nutanix (as far as I know), Nutanix started selling its platform (Acropolis Hypervisor and Prism Software) on Cisco UCS C-series servers. Nutanix now supports the following UCS servers —
Looks like the Nutanix Software bundle comes in Acropolis Pro and Ultimate Editions.
More info to follow ….
Reference: Nutanix Website
To harden your ESXi 6.0 hosts, we disable the MOB service so that any attacker can’t get to the web browser and access the MOB of the ESXi host (ex: https://esxi01.lab.com/mob), this setting will disable one of the attack vectors of theESXi hosts in the environment.
to do this, you SSH into the ESXi host where you want to disable the mob service and perform the following commands
esxi01# vim-cmd proxysvc/remove_service "/mob" "httpsWithRedirect"
to verify if the mob service has been removed from the ESXi host, use the following command
esxi01# vim-cmd proxysvc/service_list
the above command will list all the services on the ESXi host, look for the service “/mob”, if you don’t see this service, then it has been removed. if it is still there, then you will have to perform the first command and reboot the ESXi host to disable the mob service from the host.
Recently, I had to shutdown multiple ports on a Cisco MDS 9396 switch for maintenance. I had to look up the commands to do it as I haven’t done it yet as most of the customers will either shut down the switch completely or just shutdown the required ports and not multiple ports on the switch.
here are the commands to shutdown all ports on the switch at once:
MDS1# conf t
MDS1(config)# int fc1/1-40
MDS1(config-if)#shutdown
If you have to shutdown the ports and they are not in sequence, here is the command
MDS1# conf t
MDS1(config)# int fc1/1-5,fc1/7-15
MDS1(config-if)# shutdown
Hope these above commands help !!
