Recently, while I was deploying an NSX Edge Cluster in the Workload domain in the Holodeck 5.2x (I deployed VCF 5.2.1) when I encountered an error in SDDC Manager “Verify NSX BGP Peering” which failed the Adding Edge Cluster task.
Here are the screens on how it looked once I logged into NSX Manager Web UI
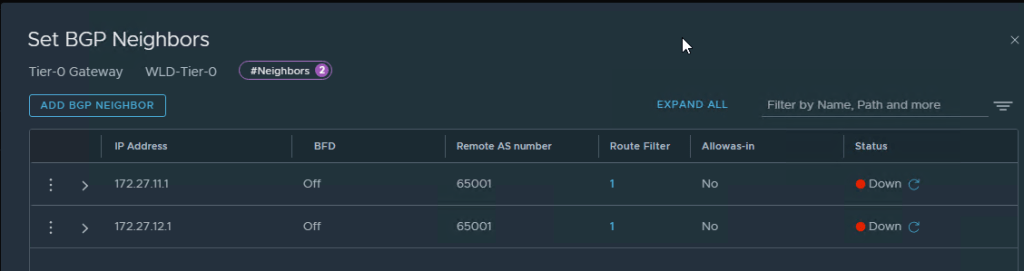
You can see that the BGP Neighbors are showing as down in the UIYou can also see that the BGP Neighbors configuration is correct but they still show as down
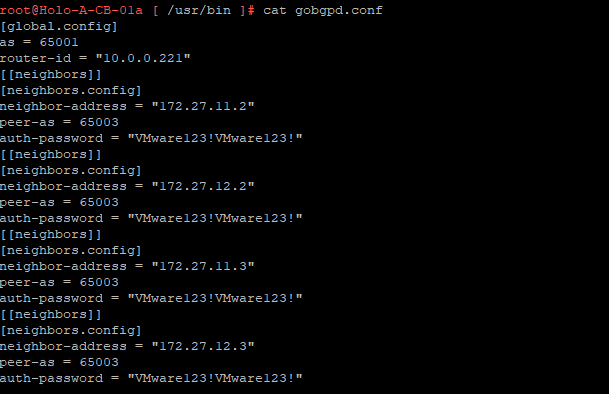
After a lot of troubleshooting, I got some help from my fellow vExpert Abbed Sedkaoui who directed me to check the BGP Configuration in CloudBuilder and the config file to check was the gobgpd.conf file in /usr/bin
This is how the old configuration was in the gobgpd.conf file which only had the BGP Neighbor IPs of the NSX Edges and it Tier-0 Config from the Management Domain
Edit this gobgpd.conf file and add the Tier-0 Uplink Interfaces as BGP Neighbors in this file as the below Screenshot
I have added the uplink IPs (172.27.11.10,11.11, 172.27.12.10,12.11) to the BGP neighbors list
Once the file is saved (You will have to hit ESC and then type :wq!, hit Enter), you can restart the gobgpd service with the following command
systemctl restart gobgpd
This will restart the gobgpd service and in a few minutes you should see the BGP Neighbors going green instead of down status in the NSX Manager UI
here is the command to check the gobgpd status in cloud builder
systemctl status gobgpd
NOTE: All the above commands are to be executed as root in the cloudbuilder appliance, first you SSH into the appliance using admin credentials and then use su to login as root in the appliance. (su creds are same as admin creds in the holodeck lab)
Now you can restart the NSX BGP Peering task again in SDDC Manager and it should go through and create the Workload Domain.
Login into the SDDC Manager, Go to the Workload Domain which you have created (In my case the workload domain name is wld-domain), go to the Edge Clusters tab
Click on Edge Clusters tab
Ignore the Errors in my lab, that’s just license errors in the lab env.
Click on Add Edge Cluster option as in the screenshot below
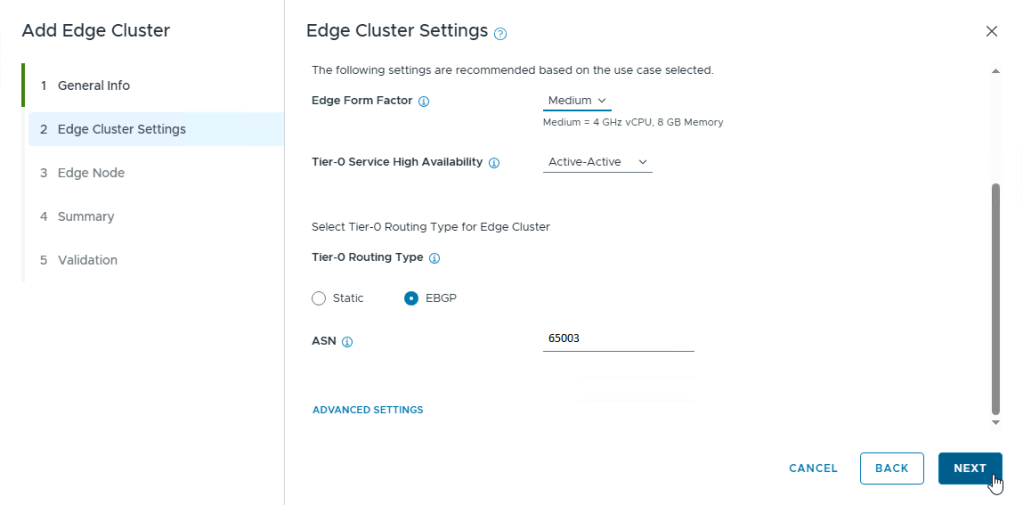
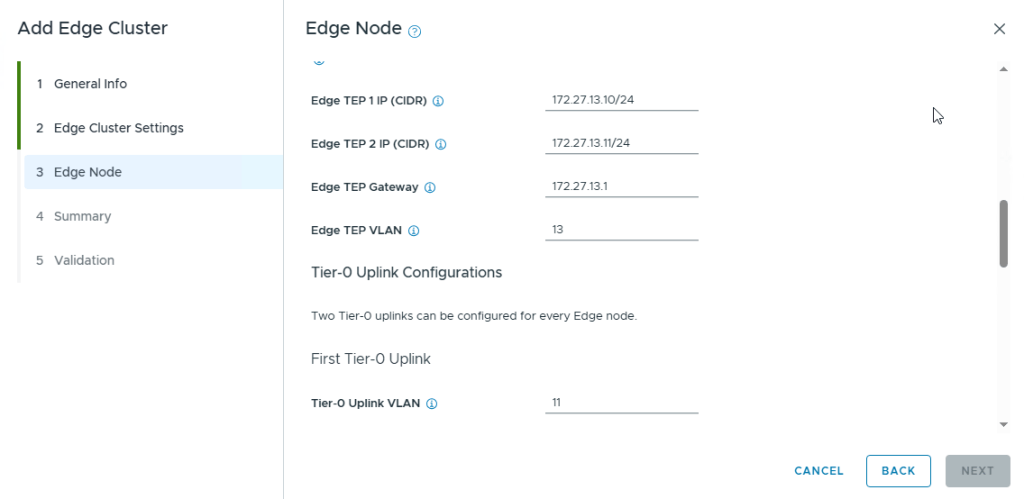
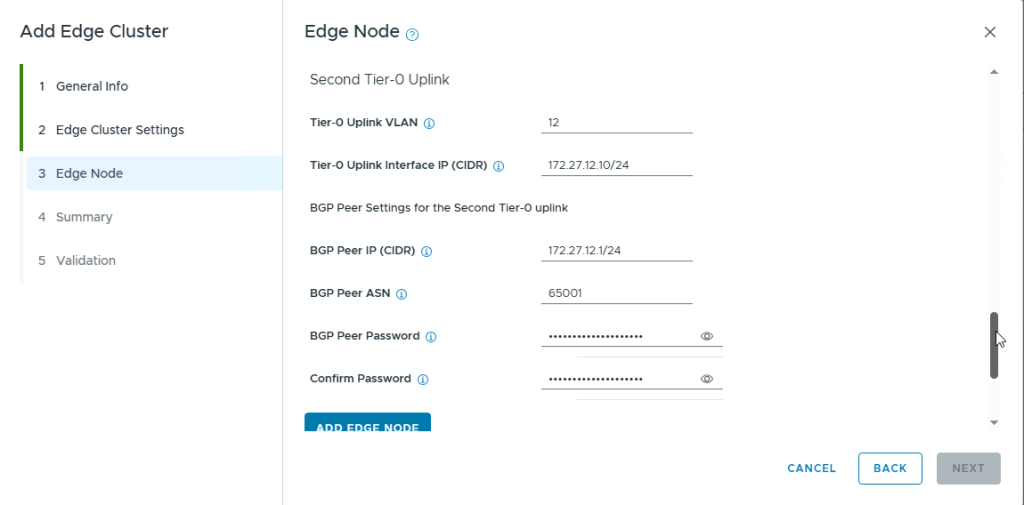
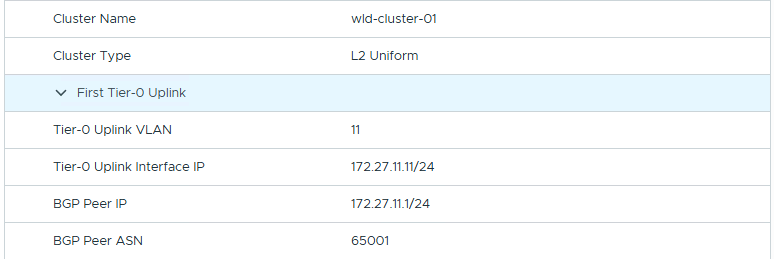
Clicking on Add Edge Cluster will pop another windowClick on Select All option and click Begin to start the processProvide the Cluster Name, MTU Size, Tier-0,1 Router Names, The Edge Cluster Profile Type is set to Default, provide the root passwords and credentials and click NextSelect the option ‘Custom’ under Edge Cluster Settings so that you can change the Edge Form Factor of the Edges (I used Medium in my lab), Select the HA option and scroll down to select the Routing typeSelect the option EBGP as we are going to use the BGP routing protocol in this Lab as that is how holodeck was designed. Use the ASN as 65003 as NSX Edges will always be in this ASN according to the architecture diagramNote the ASN of the NSX Edge Cluster and its BGP Neighbors (Cloud Builder acts as BGP Neighbor) here.Next, we provide the Edge Node detailsIn the VM Management Portgroup Name, you can give the portgroup name which you want the SDDC Manager to create as it will create the portgroup, or you can use existing VM management portgroup which was already created when we created the workload domain. If you want to use the existing portgroup, just click on the option “USE ESXI MANAGEMENT VMK’S VLAN” which is also VLAN 10 and then provide the EDGE TEP detailsEdge-1 TEP Details as per the holodeck architectureFirst Tier-0 Uplink detailsSecond Tier-0 Uplink detailsOnce you have provided all the details for Edge Node 1, click on Add Edge Node option
Perform the same steps to add the Edge Node 2 as well but with its own IP Addresses
Two Edge Nodes have been AddedSummary Screenshot 1Summary Screenshot 2Summary Screenshot 3Summary Screenshot 4Summary Screenshot 5Summary Screenshot 6Summary Screenshot 7 – Click Next for Validation of the Edges ConfigurationNSX Edge Cluster and its Validation
Once everything is Validated with no errors, it will start the Deployment of the Edge Cluster with Edges in the workload vcenter
Edge Cluster ProgressCompletion of the NSX Edge Cluster in SDDC ManagerVerification of the NSX Edge Cluster with its Edges under the workload domain in SDDC Manager
This Concludes this post on how to deploy NSX Edge Cluster with 2 Edges in the Workload Domain using SDDC Manager
I have encountered an issue while deploying the NSX Edge Cluster in the workload domain in Holodeck and that is while it was trying the NSX BGP Peering Verification from the SDDC Manager and the BGP Neighbors were down. This was not provided in any documentation and I have documented about this issue and its resolution in this post.
In this post, let us see how to reset a password and make the account active in NSX-T.
Remember that this account was created using API as you can’t create local accounts using NSX-T UI. My NSX-T version is 3.2.2.x.x
Back Story: one of the local accounts which I created for skyline collector in our NSX-T environment password was expired. Hence, I had to use the API to Update the User account password and status to make the account ACTIVE again.
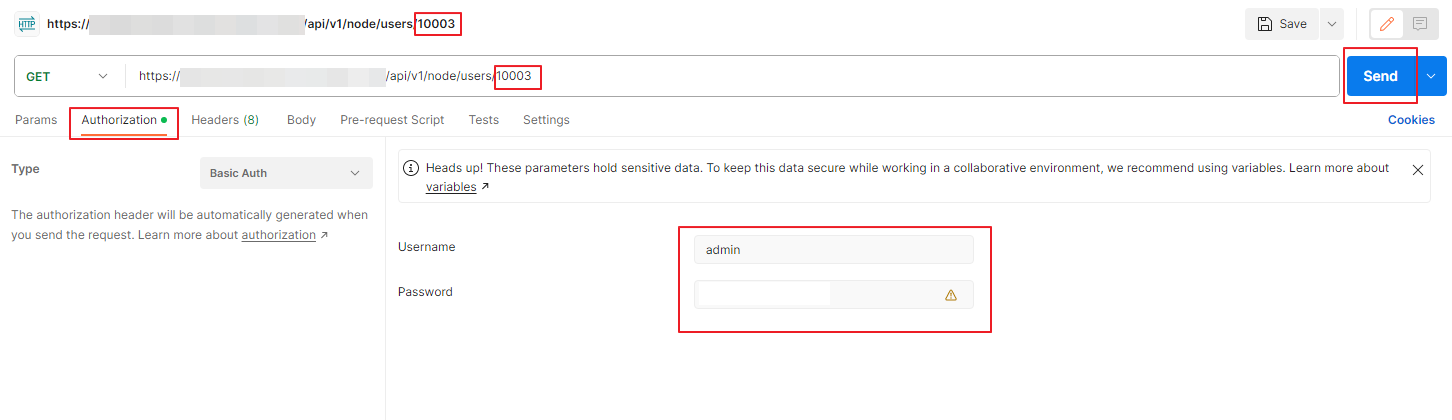
Use an API Editor like Postman to get the required data as shown in the screenshot below:
In the GET field, you will be providing the following code.
You can get the user-id pretty easily by going to System and User Management in NSX-T UI and get the user-id. In the above example my user-id is 10003. Then go to the Authorization tab and provide the username and password of the NSX-T Manager where you want to make these changes. Then click on Send option to get the required info.
you will get the data as the below screenshot.
You will observe that the last password has been changed 95 days ago, password change frequency is every 90 days, status is password expired and the actual username (in this case its labprdsky_nsxt)
you will have to change the body of this into the below values
You can change the password_change_frequency from 0 to 9999, you will have to provide the old password which is expired and the new password for this account and change the status to ACTIVE.
We will copy the above code into the body of the next PUT statement as shown below
Change the GET to PUT and insert the above code with the changed values in the body as the screenshot shown above and click on Send
The above output is in code form in case you want to copy it.
Now you can do the above GET command to get the status of the user and you will see that this account shows as active and the password change frequency is now 999 days.
Final output for GET for that user 10003
Hope this writeup helped you to unlock and reset the password of an local user created using API in NSX-T.
WARNING: This is for advanced users only and use it only for specific use cases if required or contact the VMware Support if needed.
Recently, we had to change the sequence number of one of our Security Policies in the Distributed Firewall in NSX-T version 3.2.2 and here is the procedure.
First, we use Postman/ any api editing tool to get the security policies/security policy from the nsxt manager/VIP
In the screenshot above, the number (1006) after the security policies is the security policy itself (in our case, since we had nsx-v to nsx-t migration recently, it assigned a number to the policy, However, if you have nsx-t directly, the name is the same as the actual policy name instead of a number)
you can see the sequence number shown in the above screenshot. this is what you will need next
use the POST command below to increase the sequence number
After revise the anchor path is the path where you want the security policy to be. (In my example it is before the last security policy (default_layer3) in the distributed firewall)
go to body and change it to raw in POST
Then copy the full code from starting braces { to the end braces } for the security policy you are wanting to change the sequence number
Example:
{
            "logging_enabled": false,
            "target_type": "DFW",
            "resource_type": "SecurityPolicy",
            "id": "1006",
            "display_name": "Allow-All-ENV",
            "description": "The name of this section in V setup is: 'Allow-All-ENV :: NSX Service Composer - Firewall' and its description is: 'None'. This section is imported from the V setup by V2T migrator.",
            "tags": [
                {
                    "scope": "v_origin",
                    "tag": "DFW Section-1006"
                }
            ],
            "path": "/infra/domains/default/security-policies/1006",
            "relative_path": "1006",
            "parent_path": "/infra/domains/default",
            "unique_id": "637b1cc3-f20e-4d97-9e88-3da9c4b1e2ae",
            "realization_id": "637b1cc3-f20e-4d97-9e88-3da9c4b1e2ae",
            "marked_for_delete": false,
            "overridden": false,
            "sequence_number": 999999,
            "category": "Application",
            "stateful": true,
            "tcp_strict": false,
            "locked": false,
            "lock_modified_time": 0,
            "scope": [
                "ANY"
            ],
            "is_default": false,
            "_create_time": 1688872097541,
            "_create_user": "admin",
            "_last_modified_time": 1693451058351,
            "_last_modified_user": "admin",
            "_system_owned": false,
            "_protection": "NOT_PROTECTED",
            "_revision": 1
        }
Note that I have removed the line “internal_sequence_number” from the body above and replaced the sequence number with the highest number you can provide which is 999999
The screenshot is as below
You will have to execute this atleast a few times and the sequence number increases everytime. Make sure to change the revision value at the bottom in the body (upper part of the body) everytime you execute this POST method.
Once you are satisfied with the sequence number, you are done with this change.
NOTE: Make sure you take a full backup from the NSX-T Manager before making this change
These are some of the features added/enhanced for On-prem usage with NSX 4.1.1 version
Layer 2 Networking
Filter VLAN on VLAN Transport Zone: It is now possible to define a list of VLANs authorized for a given VLAN-based transport zone, which prevents NSX tenants from using some VLANs already used for general connectivity in the datacenter.
ESX Observability Enhancements: NSX API now offers statistics for ESX overlay, ESX distributed routing and switch security (IP discovery and spoof guard) modules which were only available through the CLI in previous releases. This gives more options to monitoring the NSX modules running on ESX.
Enhanced Data Path (EDP) now supports the following improvements:
Support of double overlay encapsulation traffic coming from VMs and containers to a host switch, offering better performances to Antrea deployments.
Support of MAC and VLAN filtering, which allows a physical NIC driver to program (MAC, VLAN) pair to physical NIC Rx queue.
Optimization of flow cache for Geneve overlay traffic reducing the impact of large numbers of flows on forwarding performance.
Layer 3 Networking
IPv6 TEP (tunnel end point) support for Transport Nodes: This release introduces support for IPv6 TEP (tunnel end point) with Geneve encapsulation for Transport Nodes (Edge Nodes and ESXi hosts). With this feature, you can create overlay Transport Zones using IPv6 as the underlay transport protocol.
DPU-based Acceleration
NVIDIA BlueField-2 (100Gbps) is now supported
Edge Platform
Bare Metal Edge supports Intel 810: expands the list of supported NICs with 25Gbps/100Gbps Intel NIC.
Disabled Flow Cache Alarm on Edge Node: With VMware NSX 4.1.1, if the flow cache is disabled on Edge Transport Node, NSX triggers an alarm. This ensures Edge Transport Nodes can deliver the best performances.
Packet drop alarm: The alarm shows more specific information about packet drops, providing more granular information.
Maximum supported cores for Bare Metal Edge: With VMware NSX 4.1.1, the Bare Metal Edge node can have up to 80 cores that will maximize the performance of the Edge node.
Physical Server
Added support of Windows 2012R2 OS for the Physical server transport node.
Container Networking and Security
Scale Improvements for TKGi: NSX 4.1.1 brings scale parity for TKGi customers shifting from Manager Mode APIs to the declarative Policy APIs.
Support for more than 1000 OpenShift routes with NCP 4.1.1.
Installation and Upgrade
Run NSX pre-upgrade checks at any time and independent of the upgrade process. Check upgrade readiness and fix any underlying issues ahead of time, and use your maintenance window for actual upgrades. Benefit from latest pre-checks added dynamically by NSX.NOTE: While this capability allows you to run pre-checks in advance, they do need to be mandatorily run again before starting an NSX upgrade. This is to ensure an accurate and latest assessment of your deployment right before upgrade.
NSX Federation now supports the same upgrade interoperability of N+2 (N = minor version number in product series) as NSX on-premises.
Reduced downtime in rolling upgrade of NSX Manager cluster.
Revamped NSX Upgrade UI for better performance. Additional user experience enhancements in the NSX upgrade process.
Search <uuid> command is added to help to search the resource details using UUID to identify IP Address, Host Name, Display Name and Resource Type.
The NSX Manager UI now displays a banner when the NSX Manager is deployed by VMware Cloud Foundation. The NSX Upgrade splash page also reminds you to upgrade NSX from SDDC Manager when NSX is deployed by VMware Cloud Foundation.
Operations and Monitoring
LTA support on ESXi ENS Fastpath
Counter actions is introduced in this release and available on API, which enables users to trace the ENS fastpath and slow path traffic on the port.
Status metrics in string format can now be persisted in NAPP as Time-Series metrics, for example: cluster status metric shows the health of the NSX Manager cluster, and has values in string format i.e., stable/unstable/degraded, which can now be persisted in NAPP. This will allow you to monitor the status metrics which are strings over a period of time with historical context.
Online Diagnostic System
Thirteen new runbooks are added in this release to help with troubleshooting across Edge, Host and NSX Manager. See the Administration Guide for more information.
NSX CLI Enhancements
More than one filter can be applied on the CLI commands to filter the data, which is helpful to filter the large output.
New modifiers sed, awk, uniq are supported to filter and format the CLI output.
From the central CLI, users can now execute the commands on remote CLI using IP Address, Host Name and Display name. This provides flexibility to execute CLI commands on remote nodes using any of these identifiers.
The search <input-str> CLI command is added. This command can be used to get information such as the IP address, display name, resource type for any <input-str>. Along with the search string, resource-type parameter can be added to filter the resource type.
Transport Node APIs are updated to provide various details to aid in monitoring.
Transport Node Status API
MP connection status can be retrieved real time using source=realtime field in the API call.
For CCP connection, the status description field is added. This describes the reason for the disconnection and last status changed time field shows when the status was updated.
For pnic status, details of pnics that are down and last status change are added.
For cfgagent and opsagent, component and last status change fields are added.
Aggregated status now has status description, which shows the reason why aggregated status is not up and last aggsvc heartbeat, last status changed time added shows when the mp connection was active and status was updated.
PNIC bond Status API
Pnic bond details and type field reflecting whether it’s used for NSX or non-NSX are added.
VPN
With NSX 4.1.1 you can now enable the allocation of more cores for VPN services
Platform Security
Local User Account Management: Adds an NSX API for listing local user accounts on NSX appliances (NSX Manager, NSX Edge, NSX Application Platform, NSX Cloud Service Manager).
IPv6 TEP (tunnel end point) support for Transport Nodes
This release introduces support for IPv6 TEP (tunnel end point) with Geneve encapsulation for Transport Nodes (Edge Nodes and ESXi hosts). With this feature, users can create overlay Transport Zones using IPv6 as the underlay transport protocol.
Here are some of the features with NSX which are used to connect with NSX+ and for the Cloud model —–
Securely connect to VMware NSX+ Services: NSX 4.1.1 provides on-premises NSX Manager deployments to securely connect to NSX+ Services. Details of NSX+ Services are available in the NSX+ Release Notes.
Cloud Consumption Model with NSX VPCs: New NSX VPC allows self service consumption for networking, security and services through on-demand isolated environment aligned to Cloud standard consumption. It offers a second level of tenancy below Project, with a streamlined UI and API to allow teams to easily deploy networking and security in the Cloud environment.
Multi-tenant Distributed IDS/IPS: Distributed IDS/IPS now offers multi-tenant consumption with the ability to configure it under Projects. It allows multiple users to apply IDS/IPS rules to their own VMs without risks of overlap.